Introduction
The performance of an Ethernet hub, switch or media converter is always of interest, but little is said of the mundane task of powering these devices. In order for performance objectives to be met, a successful installation depends upon properly applying power to these devices. Incorrect powering can lead to unreliable operation, equipment damage or possibly a safety hazard.
The power for Industrial Ethernet devices is ultimately derived from mains power which can be as high as 480 V. Typically, there is a transformer or distribution system that provides mains voltages in the range of 100–240 VAC at 50–60 Hertz. This is still much too high to power the 3.3–5 VDC electronics used within the devices. What will be discussed are techniques to power these low-voltage devices.
National Electric Code
The governing electrical wiring standard in the United States (US) is the National Electric Code (NEC), but there are similar electrical codes throughout the world. Published by the National Fire Prevention Association (NFPA), the main purpose of the NEC is safety and fire prevention. Industrial Ethernet hubs, switches, and media converters are low-energy devices requiring power inputs in the range of 4 to 20 VA so it would appear that safety hazards would be minimal. However, wiring of these devices must still conform to the NEC when installed in jurisdictions within the US that have adopted the code. The NEC is over 600 pages in length and can be a confusing document when trying to find that one reference that pertains to a particular installation. Both high- and low-power installations are addressed in the code, but what part is relevant?
Industrial Ethernet equipment usually resides in control panels and, although it may not appear evident, article 725 of the code has application. Article 725 is entitled "Remote-Control, Signaling, and Power-limited Circuits." A signaling circuit supplies energy to an appliance or device that gives a visual and/or audio indication. This could be a control circuit such as an interlock or an alarm circuit for an annunciator. A power-limited circuit could be used to power low-power devices such as Industrial Ethernet hubs or switches. Article 725 defines three classes of wiring designated Class 1, 2 and 3.
Class 1
A Class 1 remote control or signaling circuit cannot operate above 600 V and could be powered from sources with no power or current limitations. These circuits must be wired with 600 V insulated conductors regardless of their operating voltage. A Class 1 power-limited circuit is that portion of wiring between a power-limited supply and the connected equipment. Voltage cannot exceed 30 V (AC or DC) and power is limited to 1,000 VA. Although the voltage is low, the same 600 volt conductors must be used. The Class 1 limited-power circuit is used when the power required exceeds that of a Class 2 circuit as defined below.
Class 2
A Class 2 circuit is defined as the wiring between a Class 2 power source and connected equipment. By limiting the power to 100 VA and the voltage to 30 V, safety is ensured against shock or fire initiation. This is the type of wiring commonly used with intercoms, security systems, thermostats and other low-energy devices. Interestingly, local area network (LAN) cables such as twisted-pair or coaxial cabling are considered Class 2 circuits. The code states that Class 2 circuits must be wired with cables rated as Class 2 (CL2) with a voltage rating of 150 V, or with Communications cable (CM) with a voltage rating of 300 V, or with Power-Limited Tray Cable (PLTC) with a voltage rating of 300 V. Do not be fooled by the voltage rating; Class 2 circuits must still operate at voltages not exceeding 30 V and must be connected to power sources that are clearly marked as Class 2 power sources. Control circuits providing 120 V control are not Class 2 circuits. The advantage of using Class 2 circuits versus Class 1 circuits is that there are fewer restrictions in wiring, but there are still restrictions.
Class 3
Class 3 circuits exceed the 30 V limitation of a Class 2 circuit so they are power-limited to only 0.5 VA. However, the voltage can be as high as 150 V. These circuits are used in similar applications as Class 2 devices but when higher voltages are required. Cabling can be CM, PLTC or Class 3 (CL3) with a voltage rating of 300 V. Class 3 circuits are not as popular as Class 2 circuits.
Other Considerations
Since LAN cabling is considered a Class 2 circuit, there would be an advantage to having the power to the Industrial Ethernet hub or switch be treated as a Class 2 circuit as well. In this way wiring constraints for both power and signal would be the same. With power requirements well below the 100 VA limit, it would seem possible to use Class 2 power sources. However, if direct mains powering is preferred, Class 1 wiring restrictions apply.
Power Supply Design
When we talk about power supplies we are talking about the electronics required in providing the proper operating voltages for the device while attached to some power source. Since power sources can be mains or derived from mains power, care must be exercised to ensure that the attached power supply can handle the input voltage. Power supplies can be internal or external to the device. Devices require low-voltage DC power while mains power exists at a much higher AC voltage. Therefore it is necessary to convert AC power to DC.
Power supplies can be considered as having three stages. The first stage converts the incoming AC to DC. The result is a DC voltage but with a high content of AC called ripple that needs to be filtered. The second stage is called an input filter that reduces the ripple to an acceptable level. The output of this stage is unregulated DC voltage. The final stage provides the necessary DC regulation for powering the low-voltage electronics used in the device. In the past, linear regulators were used but they were less efficient and dissipated excessive heat compared to the modern switching regulator. However, their function was the same—providing a regulated DC voltage from an unregulated DC source. The unregulated DC voltage must be sufficiently high so that the regulator can regulate over varying loads. Insufficient unregulated voltage leads to poor regulation and performance irregularities.
Full- and Half-Wave Rectification
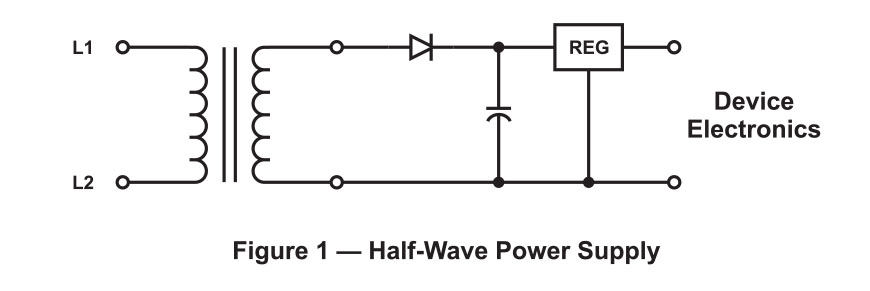
The device used to convert AC power to DC power is called a rectifier, and there are basically two types of rectifiers that can generate DC power from low voltage single phase AC source. The simplest approach is to use a half-wave rectifier as shown in Figure 1. The input capacitor charges through the diode during every positive portion of the input wave and then discharges through the regulator. Since there are both equal positive and negative portions, charging only occurs half the time which is not very efficient. The ripple content is also very high.
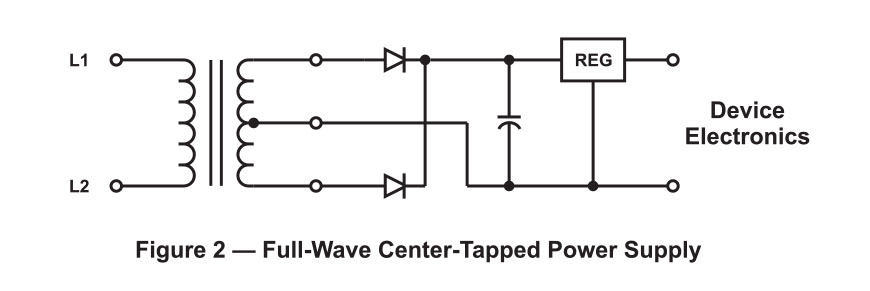
The second approach (Figure 2) adds another diode thereby allowing the capacitor to charge on both the positive and negative portions of the input wave. One diode conducts on the positive portion while the other conducts on the negative portion. This is called full-wave rectification but requires a center-tapped transformer.
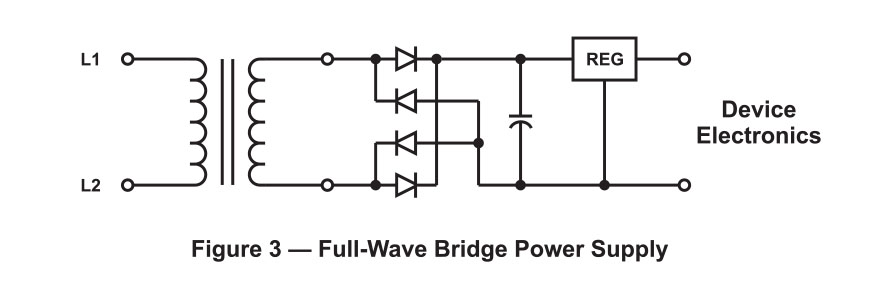
By using four diodes (Figure 3), the center-tap can be eliminated. Two diodes conduct on the positive portion while the other two conduct on the negative portion. This is a variation of the full-wave approach. With full-wave rectification, the ripple content is reduced and the ripple frequency is doubled making filtering easier. The average DC content of a full-wave rectifier is twice that of a half-wave rectifier so there are indeed advantages to full-wave rectification at a modest cost in additional diodes.
Power Supply Example
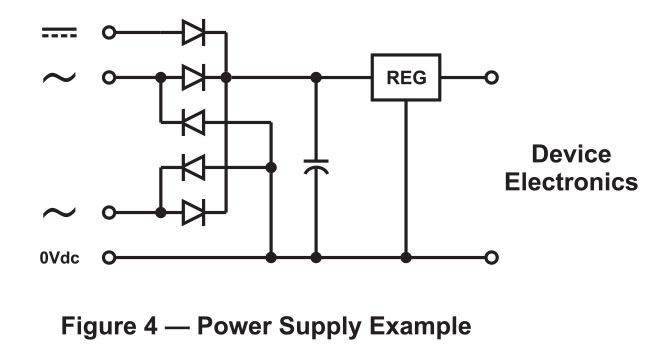
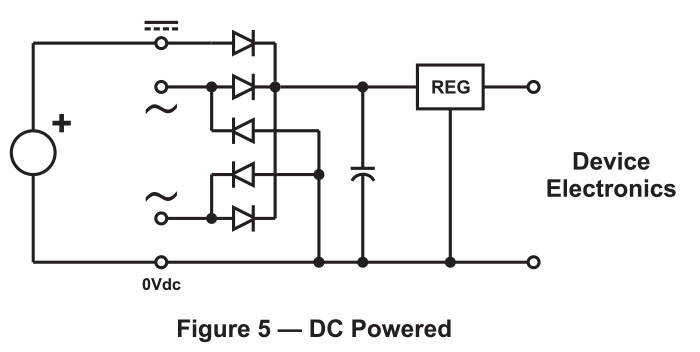
Figure 4 shows a highly flexible power supply that accommodates low-voltage half-wave and full-wave AC inputs as well as low-voltage DC inputs. By limiting the input voltage to less than 30 V, a Class 2 power source can be used since the power supply requires only 10 VA of power. The two AC input connections are indicated with a ~ symbol instructing the installer that the two wires from the secondary of a Class 2 transformer are to be connected here. There is no distinction between the two inputs so there is no restriction as to what secondary wire goes where. These pins are the full-wave bridge inputs. The remaining two pins are for DC connections with the most positive DC voltage being applied at the pin with the bar symbol. The return of the DC supply is indicated by the "0vdc" symbol. You will notice that the DC input circuit is actually a half-wave AC circuit so the possibility exists for AC or DC operation. We will review the possible input configurations.
DC Powered
With the connections of Figure 5, the power supply is configured for a DC power input. The diode in the circuit provides reverse-voltage protection. Since the power supply has its own voltage regulator, a wide range of DC input voltages is possible. The manufacturer will indicate the acceptable range in its specifications as well as the current draw. When using a switching regulator, the lower the DC input voltage, the higher the input current. This may appear counter-intuitive, but this is the nature of switching regulators. The hub or switch electronics represents a constant power load so depending upon the efficiency of the switching regulator; the input power will also be constant. That is not the case with a linear regulator. Input current remains constant with increasing input voltage since the linear regulator absorbs the increased power input—resulting in wasted energy.
Redundant DC Powered
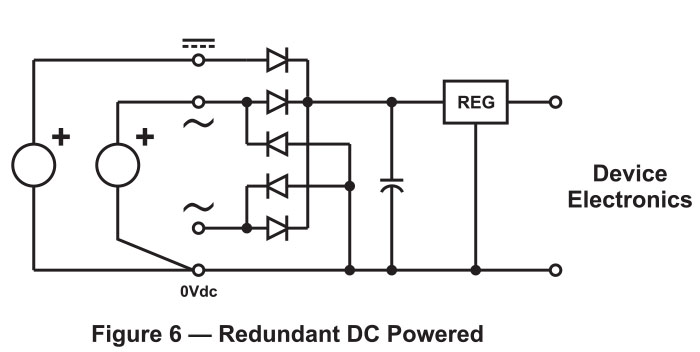
It is possible to incorporate one or more redundant DC power sources for backup purposes in case the primary source fails. However, load sharing cannot be assumed so each power source must be capable of providing adequate power in the event that the other source or sources fail. Figure 6 shows such a scheme. Either or both of the AC inputs can be used as DC inputs when the power sources are referenced to 0vdc.
However, there is a risk with this scheme since there is no reverse-voltage protection on the AC inputs when referenced to 0vdc. Unlike the DC input connection, a reverse voltage on an AC input connection with respect to 0vdc results in one of the diodes in the bridge conducting to ground, effectively applying a short circuit across the power source. Either the power source will fail or the input diode will fail, so extreme care must be exercised when using AC connections for DC backup schemes. Class 2 power sources usually have internal fuses that cannot be reset if they blow.
AC Powered
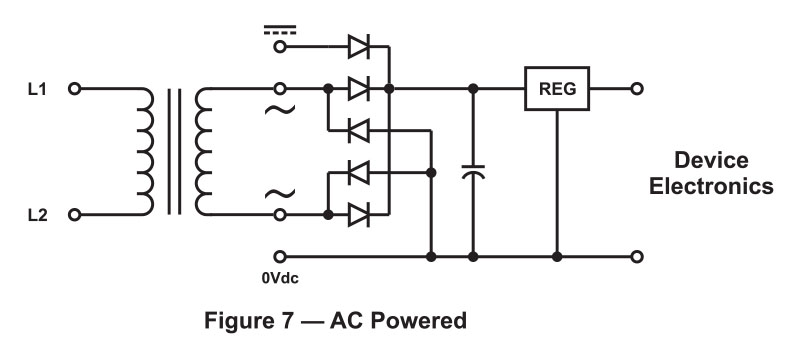
The two AC inputs are reserved for the secondary of a Class 2 transformer which then feeds a full-wave bridge as shown in Figure 7.
A full-wave bridge is used since center-tapped Class 2 transformers are not common. With full-wave rectification, a wide range of AC voltages is possible. Although 24 VAC is the most common, a 12 VAC transformer could work just as well, depending upon the power supply specification. Notice that the two AC input pins are above 0vdc and that the transformer's secondary must be floated. A floating output means that the output is not referenced to ground. This will become an important issue when we want to share transformer power with other devices. For now, assume that one transformer is required for each device when using the two AC input connections.
AC Powered with Battery Backup
It is possible to have two potential power sources—one AC and one DC connected at the same time. The DC source could be a battery or simply a DC supply from a redundant power system. Figure 8 shows the connection.
This scheme could be tricky to implement since the battery voltage, under charge, must be below the AC voltage level otherwise the battery would be powering the device all the time. The only way to know what power source is actually powering the device is to measure the current to the DC input. If it is zero, then the AC source is doing all the work. When the AC source is removed, the battery voltage must be at a sufficient level to power the device on its own. Notice that there is no provision for charging the battery while in standby mode. This must be handled by the external backup system.
Sharing Power Sources
The above wiring examples all show the use of a dedicated Class 2 power source powering one Industrial Ethernet device. You will notice that when consumer Ethernet equipment or PC accessories for the home are purchased, they come with a receptacle-mounted Class 2 power supply that is mains powered through the receptacle. These devices are sometimes called "wall warts" since they are unsightly devices that extend from the wall in a room. To use such a device in a control panel could be awkward in both appearance and utility. For example, what if there is no mains power in the control panel except low-voltage AC or DC voltage? How would we power the device then? What if vibration caused the wall wart to come loose? What if we have ten Industrial Ethernet devices to power in one control panel, where would we find the space to mount ten external power sources? The best way is to share the same power source that is used to power the other control equipment within the panel.
For DC applications, there are probably few issues. Referring to our power supply example, a common connection on the supply is marked 0 vdc. This means that it is the reference point, common point, or ground connection for the device. However, do not assume it is connected to chassis or earth. It is simply the DC reference point for the internal low-voltage electronics used in the device. Therefore when connecting multiple devices to the same DC supply, make sure that the most negative connection on the DC supply connects to 0 vdc and the most positive connects to the DC input. Also make sure that the DC power source's voltage is within the range of all devices being powered. The next step is to ensure that the total input current draw for each powered device does not exceed the capability of the DC power source or the limits of a Class 2 circuit. It is advisable to limit the total current draw to no more than 80% of the power supply's maximum capability.
For AC applications, extreme care must be exercised. The first step is to verify that all AC connected devices do not exceed the 100 VA limit of a Class 2 transformer. If this is not the case, you may want to split up the loads and use multiple transformers or switch to a Class 1 power-limited source. The next issue is to verify that all AC connected devices require a floating secondary. This would be true if all devices incorporate a full-wave bridge input. If they do, you can connect all devices in parallel to the floating secondary of the AC power source, assuming that the secondary is indeed floating. If the secondary is bonded to chassis at the transformer, it is not recommended to power the devices using the full-wave bridge inputs. This is because the potential exists that one or more of the devices has its 0 vdc reference tied to chassis thereby potentially damaging the full-wave bridge circuit that must operate above ground. Under these circumstances, we need to use half-wave rectification.
AC Powered with Grounded Secondary
If the secondary of the transformer is grounded or is referenced to 0 vdc, then we must use half-wave rectification for powering the devices. This situation is common in building automation systems (BAS) where one leg of the AC input is shared with the DC common of the device. These types of devices are half-wave rectified and cannot be connected to full-wave bridge circuits by sharing the same AC source. Separate transformers must be used. In order to share the same power source with half-wave rectified devices, we need to modify the way we wire the power supply on the Industrial Ethernet equipment. Instead of wiring to the AC connections, we wire as if the power source was DC as shown in Figure 9.
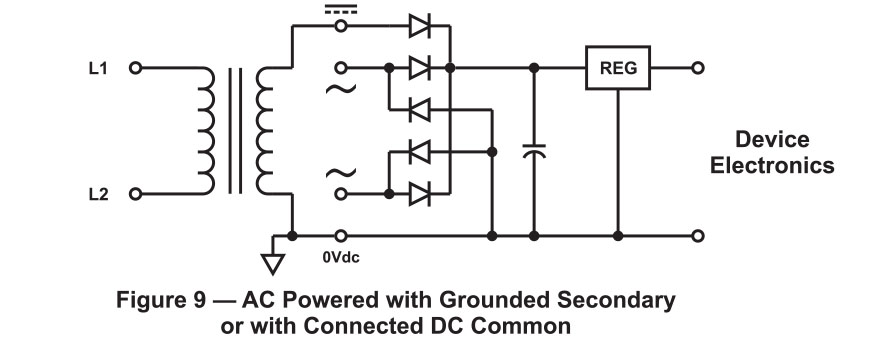
As we mentioned before, the efficiency of half-wave rectification is less than that of full-wave rectification, so the range of AC input voltage is less. Depending upon how the manufacturer rates its power supply circuit, it is possible to have two ranges for AC powering— depending on whether it is half-wave or full-wave powered. A wide range is possible with full-wave and a much more limited range is possible for half-wave. Half-wave rectified equipment such as BAS equipment usually operates from 24 VAC and it is quite possible to operate Industrial Ethernet equipment at the same voltage in half-wave mode. Check with the Industrial Ethernet equipment manufacturer's specifications. If allowed, connect the Industrial Ethernet equipment to the same power source as used by the BAS equipment following the wiring in Figure 9. By sharing the same control panel transformer, a separate transformer is eliminated— making for a neat and professional installation.
Summary
The proper powering of Industrial Ethernet equipment is necessary to ensure a successful installation. Using Class 2 power sources can simplify wiring, but care must be exercised in powering from AC sources.
References
National Electric Code, National Fire Prevention Association, 2005.

